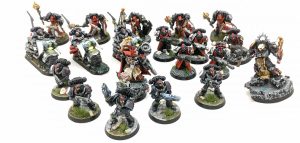
After catching up / clearing my Shadespire backlog, I was finally able to start on the kits that have been sitting in my shelves for some time – I have purchased the Redemptor, Repulsor, Aggressor and Reiver kits for the tournament in October, only putting them aside as Primaris weren’t viable choice at that time.
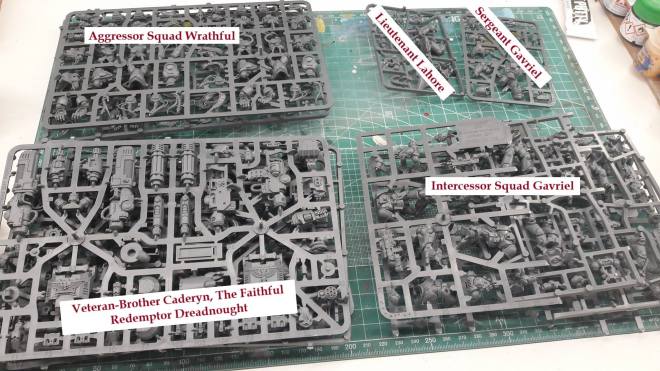
But now, with the campaign running, I finally have time to break out the sprues and start cutting. From the picture below, which is my first pledged batch (missing 5 Hellblasters that are still on their way), the first and obvious choice to start building has been Veteran-Brother Caderyn, The Faithful, Redemptor Dreadnought of 5th Company.
The kit is just awesome. It pays off to follow the instructions sometimes (more on that later), but it’s really great thing to put it together.
I started going through the instructions, as I wanted to a) magnetize all possible weapons for the ranged hand and b) make sure I stop in time for subassemblies.
Airbrush owners, rejoice, the kit has actually most of the armour plating attachable, so you can airbrush to your hearts contents in disassemblies and then put it together for final stage. There are few buts, BUT! it’s nothing that couldn’t be solved with a bit of thinking and filing.
")
")
I started with the sarcophagus. Up to this point it’s actually just slotted in (no glue) for the Gunmetal basecoat it will receive, later on I have popped it out to mount it on a cork and paint in detail.
There is not much to be said, the assembly is fairly easy and straightforward, not much cleanup necessary and the kit really goes together like a charm. I decided to glue the weapon mounts to the side of the body – the faces of them are still removable and interchangeable, but as my goal has been to have a fixed pose, I decided to glue them in position. As well, one of them (left if I recall correctly) has been more loose than the other and did not hold position properly.
Oh yes, and I drilled the exhausts. This is actually my pioneer project to test some weathering, from battle damage through oil streaks to soot on exhausts and pigments from the ground.
One note if you decide to follow the sub-assy route with airbrushing – the lower cover plate of the sarcophagus is actually made out of two separate pieces. Do yourself a favour and mount the small one before gluing the two halves of the main body together. Trying to fit it in later is… unnecessarily tedious. As well, you’ll have to snip part of the “socket” to push it in (and use a bit of force). It will still get secured on the rods with its counterpiece, so no worries about that.
")
")
")
As I have said, I am cutting no corners here. I have therefore painted all the cables on that thing and washed it all in Oil stain wash. Next step has been to make a nice shading and transition on the armour plates so I can close the top part and call it ready for gloss coats, decaling and whatnot.
Instead of zenithal highlights, I decided to try that thing where each panel is shaded from one side to the other and there is high contrast created on the panel lines, like for example on this pic. 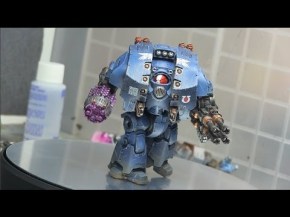
This has been probably the first time I hated myself for not staying with green marines, as the shading would be far more easier. Alas, I have tried my best and mounted them all for line-painting.
")
")
Basecoat and shaded photos. I am quite happy with them being the first attempt on this sort of thing, already carrying some lessons-learned for the next batch of this kind of armour I will be doing. After putting it together, it looks rather fine and a wash done over it will provide more blended effect. There is still missing Consecrators logo in the middle of the top-cover plate and unit bling on the left plate.
")
")
Now came the conundrum. Parallel to this, I have been making subassembly of the legs and hands. I knew this kit to be highly poseable, so I wanted to be prepared for the blu-tac posing of this thing into something that is really intimidating as well as dynamic. Well, lucky me. I have found this guy’s post and his Redemptor work is a thing of beauty – in fact, his whole Red Scorpions army is… I may try to replicate his tank camo. If my idea does not turn out, that is.
A little deflated, thinking – shit there is no way I could ever make something so awesome and as well feeling this kit deserved nothing but perfection, I tried to replicate another thing I have seen on his Dreadnought. The chapter pauldron. Well. I actually had the stencil to airbrush it on, the idea was then to trace it over with some brush strokes to give it some highlights:
")
")
Yeah. I am dumb. I got the orientation of the pad correct, but it should’ve been positioned on the opposite side (up). So it’s now soaking for paint removal and attempt number 2. This time, I will not fail.
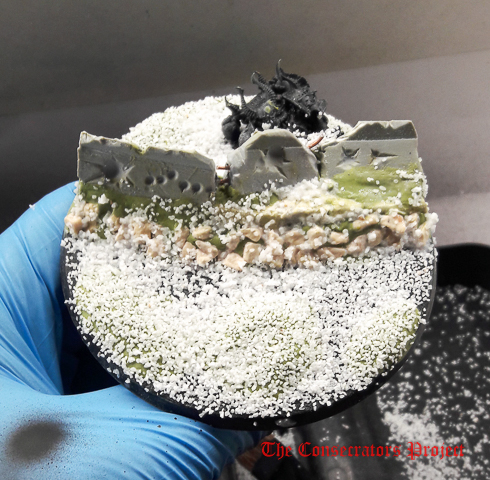
Looking for more basing ideas, dismissing foamcore rocks and plain terrain, I have remembered reading a bit on battlefield terrain where the guy mentioned using the resin pour-in blocks from ForgeWorld kits as concrete barricades. Since I own quite few of those already, plan started forming in my mind.
There were 2 options, to create a barricade with someone defending it behind it, charged by my Dreadnought, or… to try and create breached barricade with the Dreadnought already in contact with the enemy. It’s fairly clear which option I went with, obviously.
")
")
These were the first two mockups of the posing, whether it’s even feasible. From there, it developed quite quickly; little bit of battle damage, little bit of GreenStuff, little bit of rocks, rebars. With the leftover GS I just decided to make some mounds on the base so it does not look so uniformly flat.
")
")
With this having dried overnight, it was time to get into the posing and gluing the legs. I definitely recommend gluing the legs in place once you have found your desired pose. It makes it so much easier and less wobbly. And despite the glue, it’s wobbly still.
")
")
")
")
And tonight then has been finished by priming the legs and hands in gloss black primer, ready to be basecoated in the following days. Base has been flocked over some PVA glue and is now drying up to be finished.
And that’s about it for Stage 1, really. There are still things I am trying to figure out before I move on with the project:
- Magnetizing the arm. I have sealed some magnets into the moving part of the hand, but I am not sure how to make them fit from the opposite end. This should be fairly quick, nothing a short work with a drill wouldn’t fix.
- Magnetizing/pinning the torso. This thing will have to be kept in 2-pieces I am afraid, or at the very least pinned and glued, otherwise transportation might actually break it. Given how delicate the joint is and that there really is no good place to put magnets in (that are strong enough anyways), I believe pinning is in order.
- The base colour. Here I have few things that I am pondering right now… The terrain leading up to the barricade will be mud/spots of grass. The rocks and the foamcore below the barricades will be piled up mud. The barricades themselves will be concrete. So far so clear. Where I am undecided as of yet, is what colour to paint the traitor (most likely leaning for Black Legion) and whether to continue with trench mud behind him, or try to put in some other texture – like gravel?
Oh well. Things to ponder and lots of time to do it before I am able to get back to the painting table, as I will be now two consecutive weeks travelling.

[…] Next up, we have Veteran-Brother Caderyn. He’s still missing his forward facing sarcophagi weapons, but that will be fixed tomorrow. I am very happy about how the base turned out. […]
LikeLike